LEDucation
Lighting technology class
The lighting engineering class is aimed at training professionals in lighting engineering for the show such as lighting designers, lighting architect, light programmers, media server operators, the class aims to deepen, both from a theoretical and practical point of view, everything is useful for a correct lighting design.
The class provides an overview of the main aspects of lighting technology, in order to give technicians and designers knowledge and skills for a conscious and effective use of light in their projects. The courses are dispensed in the new Spotlight Course Room, a space equipped with the most modern infrastructures to allow students to experience the best technologies offered on the market today. The course can also be dispensed in collaboration with educational institutions and supplementing University Masters Study Plan. At the end of the class a final exam will be performed to consolidate the skills acquired and a certificate of participation will be issued.

What is the desired effect?
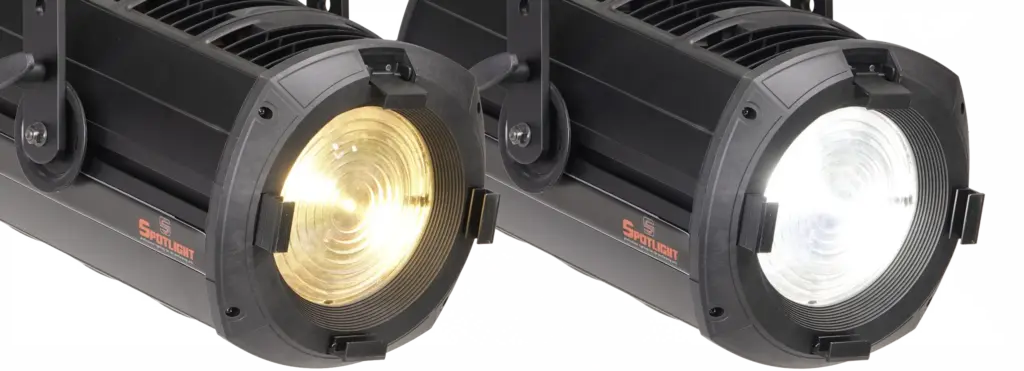

The Fresnel fixtures produce a cone of light that gives an even field of light with soft edges.
These fixtures allow accent lighting of almost any object without producing sharp contrasts between the surface being lit and the surrounding area.
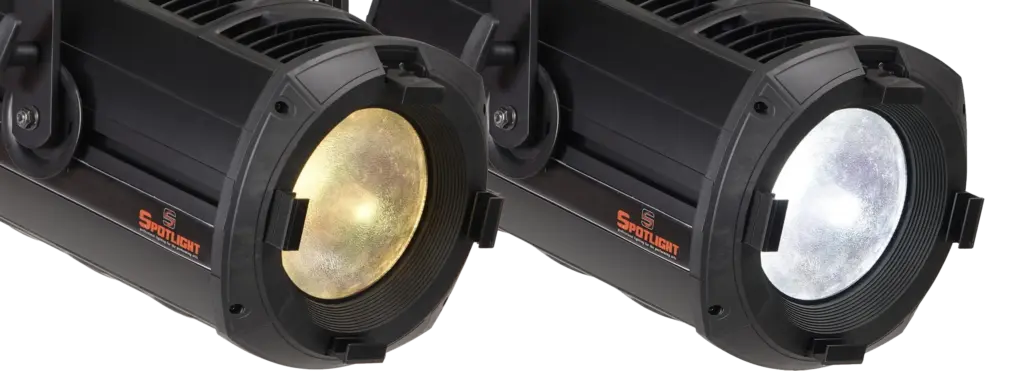

The PC fixtures produce a light beam that gives more defined edges and a greater concentration of light.
These fixtures are employed to achieve focused and even accent lighting compared to the Fresnel version.
The PC spot is normally recommended for use in applications where the area around the object being lit needs to remain completely dark and contrast between light and shade needs to be more defined.
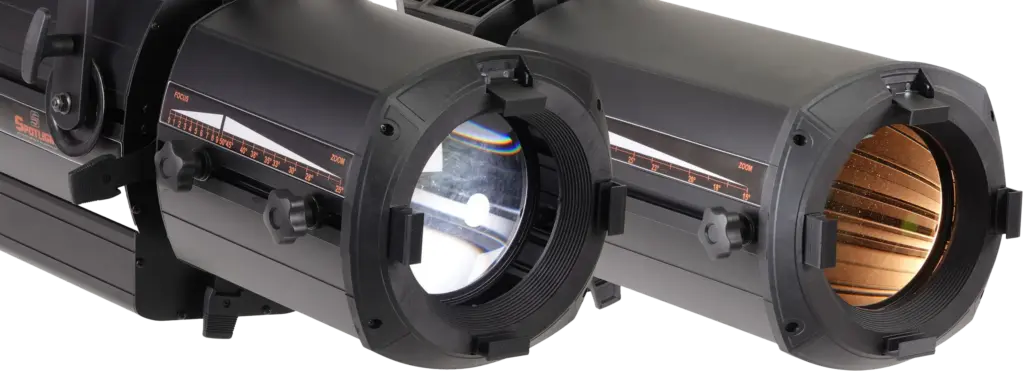

The Profile projectors, primarily utilized for accent and precision lighting, are chosen for shaping geometric forms and figures such as paintings or architectural elements.
Additionally, they serve the purpose of projecting logos and images, often referred to as gobos.
Lighting vademecum
Types of signal connection
Once powered, the spotlights can be connected to each other in three ways.
Via cable:
The control signal is transmitted through a physical cable with specific characteristics. In the case of DMX via cable, even though the standard now calls for the use of a shielded twisted pair cable (thus requiring only three pins), the header connector remains the 5-pin XLR according to the standard (unlike the widely used 3-pin XLR in audio). Normally, the length does not exceed 250-300m per line.
Wireless:
The control signal is sent from the console or the related splitter to a transmitter via cable. From the transmitter, it goes directly to the various receivers that respond based on the set DMX channel call. This solution allows covering large spaces without the clutter of cables.
Rail:
The control signal is transmitted inside an electrified rail that, in addition to supplying power to the spotlight, is also capable of transmitting the control signal. The spotlights connect to the rail via electromechanical adapters. This solution is mainly chosen for lighting showrooms or museums as it allows for greater linearity and aesthetic cleanliness.
Types of signal control
The spotlights, in order to function, must be programmable and controllable.
In the entertainment industry
The most widely used control protocol is DMX, which however does not allow programming of the spotlight; for this reason, a second (complementary) communication protocol called RDM is used.
In the architectural sector
The most widely used protocols are DALI and CASAMBI, both capable of programming and controlling the spotlight.
DMX
Control protocol that allows daisy-chain connections with a maximum number of projectors determined by the number of channels each uses in its operating mode (DMX chart).
RDM
Communication protocol complementary to DMX used to communicate bidirectionally with the spotlight and receive feedback and information about its operating settings and any fault signals.
Thanks to RDM technology, the spotlights can report operating data of the LED source, the individual color in the matrix (in the case of a colored LED), the spotlight’s operating hours, fan speed, reached temperature, any malfunctions, and critical issues.
Some parameters, besides being read, can also be set directly from the control console without necessarily accessing the spotlight physically (a very convenient solution when the spotlight is positioned in a location or at a height difficult for the operator to reach).
CASAMBI
Programming and control protocol that uses wireless Bluetooth technology for controlling medium to small areas such as shops, display windows, and small exhibition areas through simple apps and software manageable from laptops, tablets, and smartphones.
DALI (Digital Addressable Lighting Interface):
International programming and control protocol that allows controlling individual lighting fixtures by assigning a unique address to each power supply.
The system consists of two cables through which digital messages travel, capable of addressing up to 64 electronic power supplies per DALI line. Each power supply or dimmer can store up to 16 scenes.
How to
How to address a spotlight and choose its personality (DMX chart)
To control one or more spotlights via console, it is necessary to assign each one a DMX address and choose a DMX chart based on the spotlight parameters you want to control and the channels available on the console.
The first spotlight is assigned channel 1 and occupies as many channels as indicated in the chosen DMX chart.
DMX SETTINGS => DMX ADDRESS = 001
DMX SETTINGS => DMX PERSONALITY = 3ch
If the second spotlight is assigned the same channel and personality, it will behave like the first spotlight; otherwise, it is necessary to assign it the first free channel as its address and choose the mode in which it will operate.
DMX SETTINGS => DMX ADDRESS = 004
DMX SETTINGS => DMX PERSONALITY = xxx
How to emulate the performance of a halogen spotlight
In the continuous effort to satisfy light designers who are “nostalgic” for halogen light, and to approach the natural perception that the human eye has of an object illuminated by LED, it is not enough for the static light to simulate halogen light, but it must also do so in its dynamic regulation.
For an LED spotlight to behave like a halogen spotlight, three aspects must be considered:
- The dimming curve must be set to halogen
OPTIONS -> DIMMING CURVE = HALO
- The delay must be set to 1000 ms (standard delay of a halogen spotlight)
OPTIONS -> LED DELAY = 1000 ms
- The amber shift function must be activated (typical tint shift a halogen lamp tends to have when dimmed, reducing its emission)
OPTIONS -> AMBER SHIFT = ON
DMX PERSONALITY / CCT PRESET = 3200K
How to eliminate acoustic and visual disturbances
There are several ways in which a LED spotlight, especially if high-powered, can be annoying or disruptive to the audience, the artist on stage, or the musicians. These disturbances can be visual or acoustic, detectable “live” or digital and detectable by recording devices such as cameras or smartphones during filming.
All spotlights in the Hyperion Series include functions designed to resolve or minimize these disturbances.
- The silent mode function allows adjusting the speed—and therefore the noise level—of the fans based on the internal working temperatures detected by a thermostat
OPTIONS –> FAN MODE = SILENT
- The flickering effect appears in recordings when the LED emission frequency conflicts with the camera’s scanning frequency and can be resolved by adjusting the camera settings or the spotlight parameters
OPTIONS -> OUTPUT FREQUENCY = xxx (find by trial the frequency value that eliminates the flickering effect)
- To avoid unwanted light emissions from the display, it can be turned off
OPTIONS -> DISPLAY = OFF
How to set standalone and master-slave functions
Sometimes it may be necessary to control one or more spotlights without using a console.
The software allows you to create one or more static colors and define the duration and sequence of each.
STANDALONE => STANDALONE = MANUAL (creates a single static color)
STANDALONE => STANDALONE = AUTO SCENE (creates multiple static colors with customizable duration and sequence)
The function can be set on a single spotlight or on a group of spotlights.
In the latter case, it is necessary to define the “master” spotlight (MASTER, MANUAL, or AUTO SCENE) and the “slave” spotlights (SLAVE).
To disable these control modes when the console is absent, simply reconnect the DMX cable and the spotlights will be controllable remotely.
How to increase the light output by +20%
It may be necessary for the light output of individual channels to exceed the factory settings without exceeding the maximum power of the device.
When a color or CCT value is selected in which not all channels are at full, an algorithm increases the light output to achieve maximum efficiency (boost).
A microprocessor monitors the operating temperature of the LED and updates the source control parameters in real time.
OPTIONS -> FAN MODE = AUTO
OPTIONS -> LED BOOST = ON
How to calibrate colors
When using a group of spotlights, it may happen that one or more of them, despite having the same DMX values, have a color component (e.g., red) that needs to be corrected to match the color with the other spotlights.
Simply enter the spotlight menu in the LED CALIBRATION section -> RED CALIBRATION and adjust the DMX value until the color aligns with that of the other spotlights in the group.
How to customize the color library
In every colored spotlight of the Hyperion series (RGBW – 6C – 8C), two libraries are available: the first is factory-set (standard presets) and the second is customizable by the operator (custom presets), which involves a phase of creation and a phase of usage.
Both presets can be recalled by selecting the corresponding DMX value or by rotating the potentiometer.
There are two ways to customize the CUSTOM PRESETS:
From the spotlight display:
SETTINGS –> STAND ALONE –> CUSTOM PRESETS –> CUSTOM PRESET 1
Once inside CUSTOM PRESET 1:
- Set the desired color by adjusting the individual color values by turning the dimmer
- Click the CONFIRM button for final saving
- Wait for the confirmation flash indicating the save was successful
From the DMX console:
- Change the DMX value of the SERVICE 1 channel until you reach the range of the parameter to modify (e.g., CUSTOM PRESET 1) and leave the channel at this position
- Set the desired color by adjusting the individual color channels
- Save the color by setting the DMX value of the STROBE & STORE channel within the range corresponding to STORE 1, wait 5 seconds, and wait for the 5 confirmation flashes indicating the save was successful